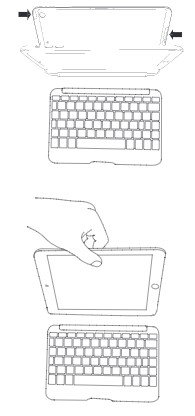
INSERTING/REMOVING YOUR iPad®
To insert your iPad® into the Slim Book open the Book’s case and remove it from the keyboard (to do this pull the case up and away from the keyboard). Then, line up your iPad with the holes in the case. Make sure the camera hole is aligned properly as well as the opening for the Lightning™ cable.
When everything is aligned, set the bottom half of your iPad in the cover and apply light pressure to ensure it is properly settled. Snap the top half of your iPad into the cover. Check all corners to make sure they have seated properly. When your iPad is secure in the case, you can connect it with the keyboard by placing it in the magnetic trough. Powerful magnets will secure it in place, but also allow you to remove your iPad any time it benefits you
To easily remove your iPad from the case, separate the case from the keyboard, and then gently roll the rubber overmold away from the edges while pressing the tablet from behind. Grasp your tablet’s exposed side and lift/pull away from the Slim Book.
